
Ordinary or common adeniums are very hardy, robust, and would make a good choice as the stock. For the scion, we'll be using the beautiful triple-petal Thai variety called Rung Arung. Shown below in the inset is the Rung Arung adenium variety.

As mentioned, to graft adenium plants, you will need two plants: the scion plant and the stock plant. In the photo below, the scion plnat, whose flower characteristics we want, is in the black pot. The stock plant, which will receive the scion or carry the the scion's flower charactersitics, is in the shallow green pot.

Tools and Materials
- Grafting tape - For wrapping the grafting point or where the scion connects to the stock. A grafting width of about 3/4" would be preferable. In the absence of a grafting tape, you may also use a thin and clear plastic sheet.
- Cutter - For cutting the branches of the scion plant and the stock plant.
- Pen - For marking purposes.
- Clear plastic bag - For sealing the graft and protecting it from the elements; rain, moisture, insects, wind, etc.
- Blade - For making the wedge cuts on the scion and stock plants.
- Scissors - For cutting the knots on the wrapped grafting tape.

Cutting the Scion and the Stock Plants
- Keep all cutting tools clean by wiping the cutting blades with rubbing alcohol. Before working, ensure that the adenium plants are properly labeled or easily distinguishable so you don't mistake the scion plant for the stock plant and vice-versa.
- Take the scion plant. The scion plant shown in this article is in a black pot and is of the Thai hybrid, Rung Arung. With a blade or cutter, cut a top stem from the scion plant. The scion stem here is around 4 inches long from the top. Set it aside.

- Take the stock plant. The stock plant in this article is in green shallow pot and is one of the common adenium varieties. With a blade (I used a half razor blade below), cut a branch from the stock plant at a point where you want the graft.
The part of the stem that will be cut should be of the same thickness or greater, than that of the cut scion. Set the stock plant aside.

- Cut a 1.5 inch length from the cut scion stem. The rest of the stem may be used as scion for grafting also. The 1.5-inch length is from the topmost tip of the stem.

- Remove all the leaves on the cut 1.5-inch length by cutting them with a sharp blade. Ensure that the cuttingis at the base of the leaves. Avoid wounding the stem as you do this.

- Shown below is what's left of the 1.5 inch of scion with all the leaves removed. The pointy part of the scion that you see in the photo is the apex of the cut scion.


Preparing the Stock and Scion for the Graft
- Slice off a wedge from the top of the stock branch that was just cut. Do this by digging the blade vertically as shown blow. Make the wedge cut around 1/2 to 3/4 inch deep. To facilitate the cut, slice with a rocking motion on the blade as you dig it downward.

- Be sure to make at least a couple of these vertical slices to cut off a complete wedge. Shown below is the wedge that was cut off from the top of the stock's branch. Discard the wedge piece that was dislodged.

- Get the scion that was cleaned earlier. With a sharp blade, make a wedge at the bottom of the scion as shown. You may also use a cutter. I just find that a very thin razor blade is easier to use. Any cutting blade that is thicker is likely to crush, instead of cleanly slice, the soft fleshy part of the stem.

- As much as possible, match the size and shape of the wedge with the wedge cut in the stock
Keep the scion wedge as symmetrical as possible. Doing so will keep it algined and centered inside the stock. Keep the wedge as flat and straight as possible.

- Carefully insert and position the scion's wedge into the stock. As much as possible, follow the direction of the growth of the stock's branch. This will make the grafted scion look more like a natural growth without the sharp or acute odd angles.

- If the scion does not seat properly in the stock, pull out the wedge. Make adjustments on the scion or on the stock. In the photo below, I chose to adjust the stock plant by creating more space in the wedge cut

- The scion now seats properly and is centered in the stock. Remember, the better the scion fits in the stock, the greater the chance of a successful graft


Wrapping the Graft
- Take a 6 to 8-inch length of grafting tape. A grafting tape of 3/4 to 1-inch width would be preferable. Position the tape at a point where the scion and stock are joined together. Leave 2 inches at the beginning of the tape before wrapping. Hold this leader tape as you wrap. This leader tape will be used for tying the knot later.

- Keep the wrapping snug and tight. Slightly pull on the leader tape and ending tape and then twist and roll it them with your fingers. Twisting and rolling the tape makes the tape thinner. This makes it easier to tie the knot. Tie two knots to completely secure the wrap.

- Cover the grafted stem with a small clear plastic bag as shown below. The small clear plastic bag protects the graft. The clear plastic will allow you to see any development in the graft.

- Tie the clear plastic bag to secure it. You could use twist ties, tie wires, rubber band or any thin tying material. In the photo below, I used a rolled piece of grafting tape.
Tying the clear plastic bag this way effectively seals the graft to help prevent rotting by keeping out external moisture.

- Optionally, mark the plant with information like: date of grafting, name of scion variety, etc. for reference. This avoids the embarrasing confusion later on when you don't know the adenium variety of the scion that was grafted.

- Put the newly-grafted plant in a quiet spot that is not likely to be disturbed by strong winds, rain and pets or other animals.
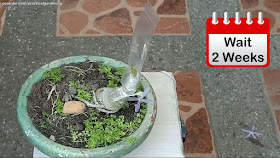
- After just the first week, the graft has sprouted a new leaf!


Unwrapping the Graft
- After 2 weeks, the graft wrap may be taken off. Cut the knot that secures the clear plastic bag with a pair of scissors.

- After removing the tying material, carefully remove the clear plastic bag by pulling it out. Notice the scion has produced more new leaves.

- Carefully cut the knot of the wrapped grafting tape.

- Slowly unwrap the grafting tape. Avoid hitting any part of the grafted scion as you unwrap the grafting tape.

- Remove the blackened and wilted remnants of the old leaves. This is just for basic housekeeping and to hasten the drying of the grafted scion.
- The graft is successful. Notice the new robust leaves. There is a "wet mark" at the base of the wedge. The grafting point is still wet because of the trapped moisture from the wrapping.

- Put the plant in the shade for drying and hardening for one week. Put it in a spot where it is unlikely to be disturbed.

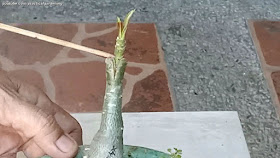
- After a week, the grafting wounds have dried and healed. The grafted Adenium is thriving! At this point, the plant may be moved to partial sun and, eventually, to full sun.


Video Tutorial
In summary, here's the video tutorial of the procedures
Happy Grafting!
No comments:
Post a Comment