- To prepare the root stock, use the pair of pruning shears to cut. Just like the scion, ensure that the cut part of the stock has the greenish cambium just beneath the bark as shown below.

If the cut part isn't green or seem to have dried out, cut lower until you get the greenish cambium layer. There is no or little chance of survival for a grafted healthy scion if the stock part that joins it had dried up or isn't healthy.
- As in the case of the scion, remove leaves and twigs along the branch that will be used as root stock. By removing leaves and twigs along the stock, the branch's energy will be diverted instead towards the development of new buds in the scion.

- With a razor blade, cut a slit in the center of the stock cut. Carefully push-slide the razor blade downward along the length of the branch. Ensure the blade runs through the center of the branch until the slit is about 1/2" or 3/4" deep. The thinner the stock and scion, the shallower the slit.

- The depth of the slit on the stock should roughly match the length of the wedge on the scion. Here, I kept the blade stuck in the root stock and then compared the slit depth with that of the scion's wedge.

- Use the pointed edge of the cutter or knife or even a pointed toothpick to pry open the slit. Be careful not to force the cutter or you might break the thin parts of the stock. The opening should just be big enough for the pointed end of the wedge to enter.
Insert the wedge of the scion from the top into the slit opening as shown below.

- Slowly push downward the scion's wedge into the stock's slit. Be careful not to break the opened parts of the rootstock.

- Take a piece of grafting tape around 2" long and 3/4" wide and start wrapping the graft (or where the scion and stock are joined) from the bottom of the graft. Notice that the scion stays seated on the root stock because the stock is compressing on the scion's wedge.

- The grafting tape is highly stretchable so continue wrapping towards the top the graft. Ensure the graft tape is tight enough to create a reasonable seal.

- After wrapping the graft's top, continue wrapping downwards toward the beginning of the graft tape. Tie together both ends of the grafting tape.

- If the ends of the grafting tape are too frayed or wide, roll the ends together with your index fingers and thumbs as shown below.

- Tie two knots to secure the ends of the graft wrap together.

- The next step is to wrap the scion. For some gardeners, this is an optional step. I just find a high success rate with the scion wrap. The scion wrap protects the scion and keeps it from prematurely drying.
Take a piece of grafting tape that's 3" to 4" long. Cover the top of the scion as shown below.

- Pull down the tab of the grafting tape to cover the top completely.

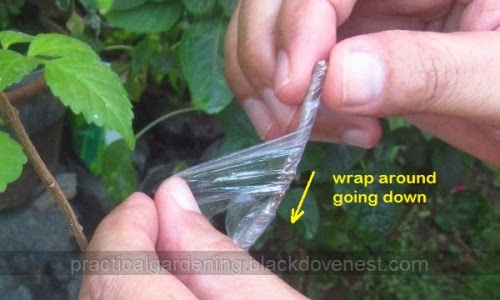
- While still pulling the tab, start wrapping the grafting tape so it encloses the loose tape tab.

- Continue wrapping the scion downward slightly stretching on the grafting tape.
- Continue until you reach the graft wrap. Pull on one of the tied ends of the graft wrap. Use the tied end of the graft wrap to tie it with the end of the scion wrap.

- Roll the ends to facilitate creating a knot that will secure the scion wrap.

- Cover the wrapped scion with a scion bag. This could be a small (1.5" wide) clear plastic bag around 4"-5" long.

- Be sure the scion bag is clear enough so you could see through it and monitor the progress of the the newly-grafted scion.

- Squeeze the opening of the scion bag towards the branch and then secure it with a tie wire or twist tie.


Cleft Grafting, Top-Wedge Graft or V-Graft - Part 3
(This is the continuation from Part 2)


Go ahead, post your comment below!