
The Four-Petal Pattern is so named because the design appears to be the four petals of a flower. The same technique may be used for a six-petal pattern.

How to Create the Four-Petal Pattern of Adenium Stem Sculpture
Materials
- Adenium Plant (Desert Rose) - The plant should have a stem that is long and thick enough to allow you to cut four strips of the same thickness. Allow the space for the Adenium strips to have at least 7 inches in length. The stem thickness should be at least 3/4 inch. Note, though, that the thicker the stem, the more difficult it will be to cut lengthwise.
- Rubbing Alcohol and Cotton - For cleaning the cutting tools. A clean rag or paper towels may also be used instead of cotton.
- Cinnamon Powder - This is to be applied on fresh cuts after cutting or slicing the stem. Cinnamon powder helps prevent fungal diseases that may result in rot.
- Cutter - This is the main cutting tool. An alternative would be a half-razor blade as was used in the previous project.
- Pen - This is for marking points as well as for drawing lines on the Adenium stem.
- Ruler - For measuring and for drawing lines.
- Plastic Bottle Caps - Four bottle caps will be used for forming the Adenium strips into loops. The caps used for this tutorial are plastic caps from discarded Gatorade bottles.

Procedures
- Clear the cutter blade from any debris. This may be in the form of hardened sap that may have dried. Scratching these with your fingernails may suffice.

- Apply rubbing alcohol on a piece of cotton and then wipe the blade of the cutter to disinfect it.

- Put the Adenium plant on your workplace. Turn the pot with one hand and see if the stem is reasonably vertical and straight. This project requires the plant to have a straight stem.

- If there is a bend on the stem, straighten it out by bending in the opposite direction. This is a simple massaging technique that will manipulate the shape of the stem into the form you want.

- Mark the Top and Bottom Points. Start with the Bottom Point. The Bottom Point should be at least 4 inches above the soil surface.
Typically, it should be at a point in the stem that may still be cut. Use a pen to mark the Bottom Point as shown below.

- From the Bottom Point, measure 7 inches above it with a ruler. Mark the Top Point with a pen. Be sure the Top Point and Bottom Points are drawn around the circumference of the stem so they're visible from all sides.

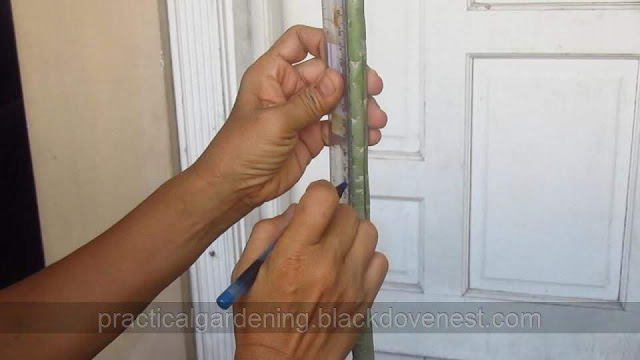
- With a ruler and a pen, draw a vertical straight line from the Top Point to the Bottom Point.

- Holding the stem firmly with your left hand, pierce the Top Point with the cutter. Be sure the cutter blade goes out the other side, and passing through the centerline of the stem.

- You may use your left hand to hold the pointed end of the cutter blade. With a rocking motion, create a downward vertical cut using both hands.

- Ensure the blade follows the vertical line so the resulting two Adenium strips are of the same thickness. Do not go beyond the marked Bottom Point of the stem.

- By the same token, go back to the top part of the stem and make a clean cut without going past the Top Point.

- Briefly pass the cutter blade into the slit to ensure that the vertical cut is complete.

- Rotate the pot by a quarter turn so you're facing one side of the stem with no cuts. Draw a second vertical line from the Top Point to the Bottom Point.
- Rotate the pot so the other side of the stem faces you. Draw the third vertical line from the Top Point to the Bottom Point.

- Make the second cut. Insert a short bamboo stick into the slit at the top part of the first cut. This short stick will act as a spacer and will create room that will facilitate the vertical cutting of the strip.

- Start the second cut with the cutter blade above the spacer.

- Continue the cut moving down below the spacer.

- Move the spacer as you go down making the cut. Towards the bottom, hold the Adenium stem firmly and apply more pressure on the cut. This is because at this point, the stem is more mature, therefore thicker and harder.

- As in the previous first cut, do not go beyond the Bottom Point.

- Rotate the pot by half a turn to face the other side. Make the third cut, using the spacer as employed in the second cut.

- Ensure all cuts are clean and do not go beyond the Top and Bottom Points.

- The three cuts have resulted in four Adenium strips. With the left hand holding the top part of the stem, hold a stick with the other hand to separate the strips. Because the lower part of the strips are harder and thicker, use the stick on this lower part.
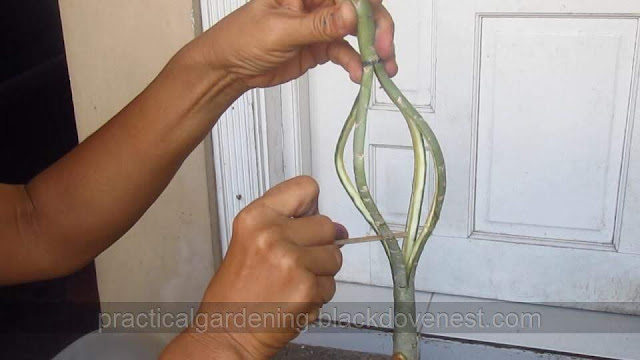
- Slowly lower the top half of the stem. As you do this, bend the strips outward with your fingers. Do this repeatedly and gently so none of the strips break.

- Once the upper half touches the lower half, twist the loops either clockwise or counterclockwise, but not both.

- Be consistent in the twisting of all four loops to just one direction, either clockwise or counterclockwise.

- Tie the four loops together to the stem with a long piece of thin wire or twist ties. Keep the whole plant as vertical and as straight as possible.

- Use a bamboo stick as a splint to ensure the plant is straight. Tie the upper and lower halves of the plant to the bamboo stick.

- To shape and form the Adenium loops into circles, use plastic bottle caps. Carefully insert the plastic bottle caps inside the loops as shown.
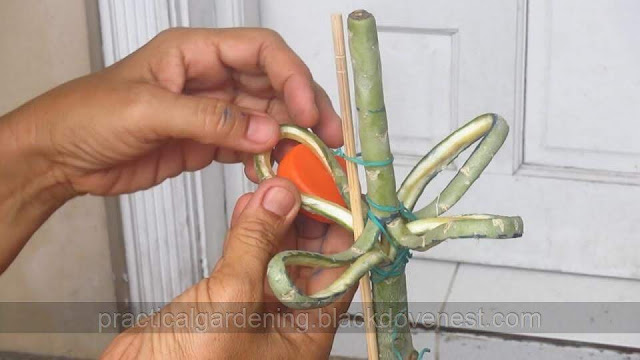
- This will ensure that the loops will retain their shape while the plant heals and recovers.

- Make each loop equidistant from each other. Adjust by bending them closer together or farther apart.

- The loops tend to naturally curl upward. To get a flatter Four-Petal pattern, bend opposite pairs of the loops downward.

- Sprinkle dry cinnamon powder on the fresh cuts of the Adenium strips. This will help prevent fungal diseases and rot.


Healing and Recovery
Put the Adenium plant in partial shade for two weeks. Keep the plant dry and undisturbed during this period. After two weeks, put the plant in full sun and water regularly as usual.
After one month, remove all the plastic bottle caps, the twist ties and the splint. After one more month, new growth should appear on the plant as shown below.
Notice how the Adenium strip loops have healed and dried.

This technique may be used to create a Six-Petal pattern by creating six strips instead of four.
Finally, here's the youtube video for this tutorial.
Enjoy!


Go ahead, post your comment below!