
I remember the technicians supposedly show how you can make identical plants from an existing one. They had a live potted plant on a demo table and proceeded to show air-layering (or marcotting) and propagation from cuttings. I was incredulous of course. But I was a bit doubtful also especially after the technicians said it will take a few weeks or months before the marcots or cuttings would actually take root.
Many years, nay, decades later, I'd learn air layering is so easy to do and yes, it works.
How Air Layering Works for Propagation
from cropsreview.com
The formation of adventitious roots during air layering is induced by various stem treatments. These generally involve the girdling or wounding of a small part of the stem, resulting to the interruption of the downward movement of organic materials such as carbohydrates, auxin and other growth factors from the leaves and shoot tips. These materials accumulate close to the treated area and rooting follows.
Continuous moisture, sufficient aeration, and moderate temperatures in the rooting zone affect the formation of roots on layers or marcots. These conditions can be provided by using a loose rooting medium with high water holding capacity such as a sphagnum moss or coconut coir/dust. It has been observed also that the rainy season favors rooting rather than the hot, dry season.
The application of rooting hormone to the injured stem is sometimes effective. This can be applied in powder form, lanolin, or as a dilute solution.
Rooting success likewise depends on the plant species. In general, plants which can be propagated using stem cuttings will also root through air layering. Prostrate stems of some plants which naturally root at the point of contact with the soil indicate that these plants can be easily rooted using this method, as with stem cuttings.
Easy-to-Follow Instructions for Air Layering
Materials
- Sharp Knife
- Plastic sheet or film, 3 inches wide and 6 inches long - 1 pc
- Tie wires, 1 1/2 inch long - 2 pcs
- Coconut Husk
- Coconut Dust
Procedure
Select Branch for Air Layering
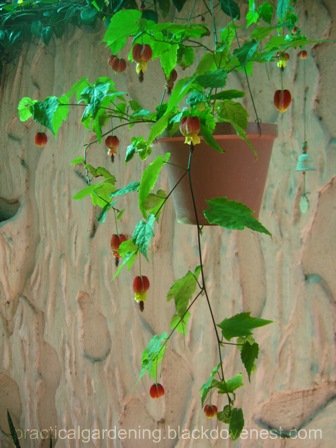
Here, I chose a Chinese Bell Flower plant, sometimes called Chinese Lantern (Abutilon megapotamicum). This plant has thin, woody stems that's quite easy to marcot.
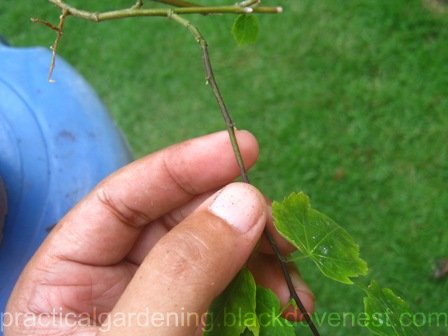
Choose the branch that is near old growth that is still greenish in color. Select a section of the branch 3 inches long that is clear of leaves or stems.
If there are leaves in nearby stems or branches that impede air layering, trim them off. There's no need to cut off nearby branches, just the leaves.
Cutting a Wound on the Branch for Marcotting
- Make two parallel cuts (bottom cut and top cut) about 1/2 to 1 inch apart around the stem and through the bark and cambium layer. "Bottom" here refers to the part of the air layer wound closer to the plant roots. Use a sharp knife to cut around (ring cut) the branch's perimeter. Hold the branch firmly but not tightly to avoid breaking the branch.

- Make a ring cut at the top of the wound area as in the above.

- Using the knife, slice off the bark layer in strips. It is easier to make the cuts towards you. Remove the ring of bark, leaving the inner woody tissue exposed. Scrape the newly bared ring to remove the cambial tissue. This prevents a bridge of callus tissue from forming.

This is how the air layering wound will look like after removing the ring of bark and the cambium. Notice the whitish color of the wound.


Wrapping the Potting Medium on the Air Layer
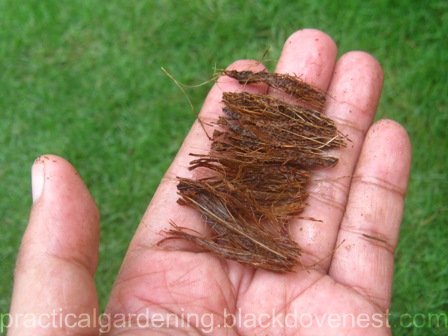
- Prepare a piece of coconut husk that is about 1 1/2 inches wide and around 3 inches long.
This piece acts as a web or shell to hold together the coco dust as potting medium. There are other advantages in using coconut husk for air-layering.
- Take a small amount of coco dust enough to cover the air layering wound and put it on top of the coconut husk as shown below.

- Soak the husk and the coco dust in water so that it becomes moist. An alternative is to pour a little water on the coco dust.

Squeeze out surplus water before using, since excessive moisture will result in decay and deterioration of the plant tissue. It is also difficult to work with the air layering materials with potting medium (coco husk and dust) that's dripping wet.
- Position the potting medium under the exposed wound, ensuring that the potting medium will cover the wound entirely.

- Wrap the potting medium around the wound with the coconut husk holding together the coco dust.

When packing the potting medium material around the plant's wound, form the material into a ball with your fingers, so that the potting medium is mostly surrounding just the wound.
This will allow you to have tapered ends at the top and bottom of the marcot ball.
- While maintaining the potting medium ball around the air layering wound with one hand, wrap around a clear thin plastic sheet with the other hand as shown below.

- Twist the ends of the air layer in the direction of the plastic sheet wrapping.

- With a couple of twist ties, tightly close the ends of the air layer. For consistency, I just twist the two ends of the tie wire in a clockwise direction. To prevent the spilling of the coco dust material, close the bottom end first.


Instructional Video on Air Layering or Marcotting
Other articles in this series:
- Harvesting and Potting Air-Layered Seedlings
- Air Layering Kit and Propagation Tips
- Air Layering Propagation Materials


Go ahead, post your comment below!
Hi! It's half past 1 in the morning and i'm still going on and about your blog :) i'm really glad I finally came across a gardening site that actually features local plants and materials. There are very few articles regarding propagation techniques and home made fertilizers in the philippines. I hope to find more of those interesting and helpful posts in the future. :)
Thank you. And thanx for dropping by. Do tell your friends and spread the news!
Thanks for this wonderful blog. I've learned a lot. Hope you can write more about gardening.
Btw, you gave me an idea for the hanging plants.
Good for you! Spread the news, and thanx for stopping by.
Hi. Thanks for this blog. It really hepls me a lot, specially in practicing this methods and techniques.
Is there a possibility of marcotting an old coconut?
Good question about the coconut. Not sure if it'll work. I've not seen it done yet.
Hi, first I’d like to say I love your post, my question is, can I use saran wrap to wrap the soil around the injured part of a branch? Thank you!
Yes, you may use saran wrap. As long as it secures the soil, you're good to go!
Thanks, this has helped me with my course work,